Stop the Drip: A Comprehensive Guide to Fixing a Leaking Delta Faucet
A leaking Delta faucet is more than just an annoyance; it’s a drain on your wallet and a waste of precious water. That persistent drip, drip, drip can quickly escalate your water bill and contribute to unnecessary environmental impact. Fortunately, most Delta faucet leaks are relatively easy to fix with a few simple tools and a bit of know-how. This comprehensive guide will walk you through the process of diagnosing the cause of the leaking Delta faucet and implementing the necessary repairs.
Understanding the Anatomy of a Delta Faucet
Before diving into the repair process, it’s crucial to understand the different types of Delta faucets and their internal components. Delta offers a variety of faucet styles, including:
- Single-Handle Faucets: These faucets use a single lever to control both water temperature and flow.
- Two-Handle Faucets: These faucets have separate handles for hot and cold water.
- Pull-Down Faucets: These faucets feature a spray head that can be pulled down for added reach.
- Touch Faucets: These faucets use touch technology to turn the water on and off.
While the external designs vary, most Delta faucets share similar internal components, including:
- Cartridge: The cartridge is the heart of the faucet, controlling the flow and temperature of the water.
- O-rings: These small rubber rings create a seal between the various components of the faucet.
- Seats and Springs: These components work together to control the flow of water and prevent leaks.
- Aerator: The aerator mixes air into the water stream to create a smoother flow.
Identifying the Cause of the Leak
The first step in fixing a leaking Delta faucet is to identify the source of the leak. Common causes include:
- Worn-Out Cartridge: A worn-out cartridge is the most common cause of leaks in single-handle Delta faucets.
- Damaged O-rings: O-rings can become brittle and cracked over time, leading to leaks.
- Corroded Seats and Springs: Mineral buildup can corrode the seats and springs, preventing them from sealing properly.
- Loose Connections: Loose connections between the faucet and the water supply lines can also cause leaks.
To pinpoint the source of the leak, carefully inspect the faucet while it’s running. Look for drips around the base of the handle, the spout, or the connection points. If you can’t easily identify the source, try drying the faucet completely and then running the water briefly to see where the leak originates.
Tools and Materials You’ll Need
Before you begin the repair process, gather the necessary tools and materials. You’ll likely need:
- Adjustable Wrench: For loosening and tightening nuts and bolts.
- Screwdrivers: Both Phillips head and flathead screwdrivers may be required.
- Allen Wrench Set: Some Delta faucets use Allen screws.
- Pliers: For gripping and manipulating small parts.
- Penetrating Oil: To loosen stubborn nuts and bolts.
- Replacement Parts: Purchase the appropriate replacement cartridge, O-rings, seats, and springs for your specific Delta faucet model.
- Clean Cloths or Sponges: For cleaning up spills.
- Basin Wrench (Optional): For accessing hard-to-reach nuts under the sink.
Step-by-Step Guide to Repairing a Leaking Delta Faucet
Once you’ve identified the cause of the leak and gathered your tools, follow these steps to repair your leaking Delta faucet:
Step 1: Turn Off the Water Supply
Before you begin any repairs, turn off the water supply to the faucet. Locate the shut-off valves under the sink and turn them clockwise until they are completely closed. If you don’t have shut-off valves, you’ll need to turn off the main water supply to your house.
Step 2: Disassemble the Faucet
Carefully disassemble the faucet, taking note of the order in which the parts are removed. Consult your Delta faucet‘s instruction manual or search online for a diagram of your specific model. Typically, this involves removing the handle, escutcheon (the decorative plate around the handle), and any other visible components to access the cartridge or other internal parts.
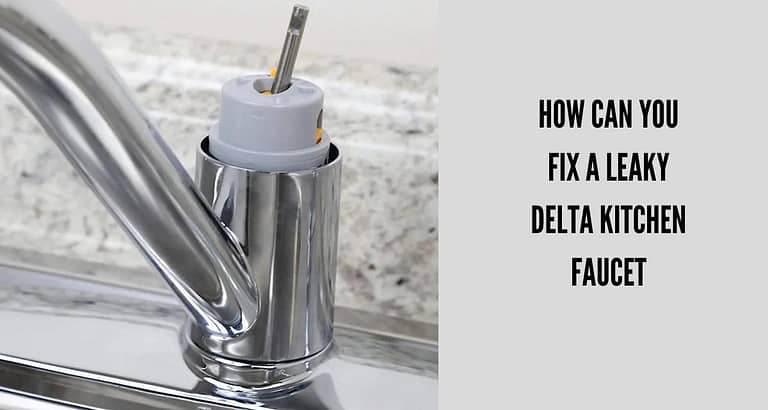
Step 3: Remove the Old Cartridge (If Applicable)
If the leak is due to a worn-out cartridge, remove the old cartridge using a cartridge puller tool or pliers. Be careful not to damage the faucet body. Once the old cartridge is removed, clean the area thoroughly.
Step 4: Replace the O-rings, Seats, and Springs
Inspect the O-rings, seats, and springs for any signs of damage or wear. Replace any worn or damaged parts with new ones. Lubricate the new O-rings with plumber’s grease before installing them.
Step 5: Install the New Cartridge (If Applicable)
Install the new cartridge into the faucet body, making sure it is properly aligned. Secure the cartridge with the retaining clip or nut. [See also: Choosing the Right Faucet Cartridge]
Step 6: Reassemble the Faucet
Reassemble the faucet in the reverse order of disassembly. Make sure all components are securely tightened, but avoid over-tightening, which could damage the faucet.
Step 7: Turn On the Water Supply and Test for Leaks
Slowly turn on the water supply and check for leaks. If you still see leaks, double-check your work and make sure all components are properly installed and tightened. If the Delta faucet is still leaking, you may need to consult a professional plumber.
Preventing Future Leaks
To prevent future Delta faucet leaks, consider these tips:
- Regularly Inspect Your Faucets: Check your faucets for leaks on a regular basis and address any issues promptly.
- Use a Water Softener: Hard water can cause mineral buildup, which can damage faucet components. A water softener can help to prevent this.
- Avoid Over-Tightening: Over-tightening nuts and bolts can damage the faucet and lead to leaks.
- Replace Worn Parts Promptly: Don’t wait until a faucet is leaking to replace worn parts. Replacing O-rings and cartridges on a regular basis can help to prevent leaks.
When to Call a Professional
While many Delta faucet leaks can be fixed with DIY repairs, there are some situations where it’s best to call a professional plumber. These include:
- You’re not comfortable performing the repairs yourself.
- You’ve tried to fix the leak yourself, but it’s still leaking.
- The leak is coming from a difficult-to-access area.
- You suspect there may be a more serious plumbing problem.
A professional plumber has the experience and expertise to diagnose and repair even the most complex Delta faucet leaks.
Conclusion
A leaking Delta faucet can be a frustrating problem, but with a little patience and the right tools, you can often fix it yourself. By following the steps outlined in this guide, you can diagnose the cause of the leak, replace the necessary parts, and prevent future leaks. Remember to always turn off the water supply before beginning any repairs, and don’t hesitate to call a professional if you’re not comfortable performing the repairs yourself. Addressing a leaking Delta faucet promptly not only saves water and money but also prevents potential water damage to your home. Don’t let that drip continue – take action today to fix your leaking Delta faucet!
Remember to consult your specific Delta faucet model’s instructions for the most accurate guidance. Good luck!
